Come migliorare la qualità della registrazione OBS?
If you are a video creator but notice that the OBS recording quality is unsatisfactory, you may want to configure the settings to get a better output. However, because the application has several options to configure, new users may get confused with all the technical terms and several menus and lists.Qualità della registrazione OBSè insoddisfacente, potresti voler configurare le impostazioni per ottenere un output migliore. Tuttavia, poiché l'applicazione ha diverse opzioni da configurare, i nuovi utenti possono essere confusi con tutti i termini tecnici e diversi menu e elenchi.
With that said, in the following sections, you will learn how to improve OBS recording quality. In addition, you will also get to know about the best alternative to OBS that you can use to bypass all the quality-related issues and make your entire screencasting process super easy.Come migliorare la qualità della registrazione OBS. Inoltre, si conosce anche la migliore alternativa a OBS che si può usare per aggirare tutti i problemi legati alla qualità e rendere l'intero processo di screencasting super semplice.
Why is OBS Recording Quality So Bad?
Lang: The Qualità della registrazione OBS majorly depends on the hardware of your PC and the capture settings that your instance of the application is configured to use. For example, if your GPU is old and you try to record your screen at 1080p and 60fps, you may get a blurry output. This happens because, in such a case, OBS tries to add information that doesn't exist, and therefore inducing something out of nowhere causes issues.
Another situation could be when you are trying to record gameplay. In this scenario, even if you configure OBS according to the recommended settings, you get a low-quality resolution until you enable 'Game Mode' (in Windows). Sometimes even after this, you may get bad OBS recording quality as many other factors could play their part in the background.
How to Fix OBS Low-Quality Issues?
This question has three answers, i.e., three solutions, and you can try all of them to see which one works for you.
Solution 1: High-Quality Recording Settings (Before OBS Recording)
If your OBS recording is low-quality, you should try configuring the program's settings first to see if it helps. A couple of things that you may want to check and set up include:
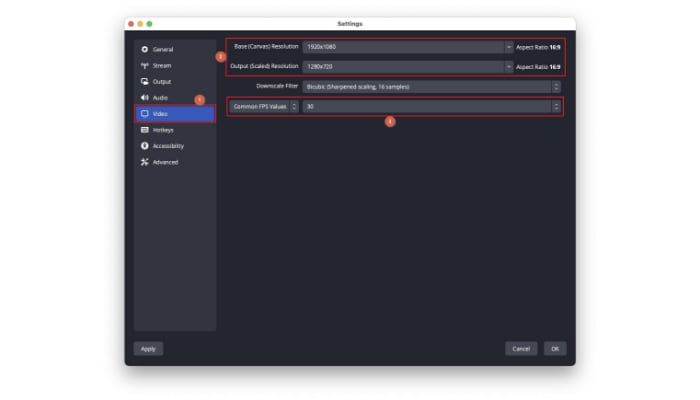
- DS
IftORQBat 1920p x 1080p, you may want to reduce the capturing resolution to 1280p x 720p. DS ensures that OBS adds no additional information to the footage, thus giving you only the data the tool records. In addition, consider setting the FPS to 30.
YCDATFVCOBSB
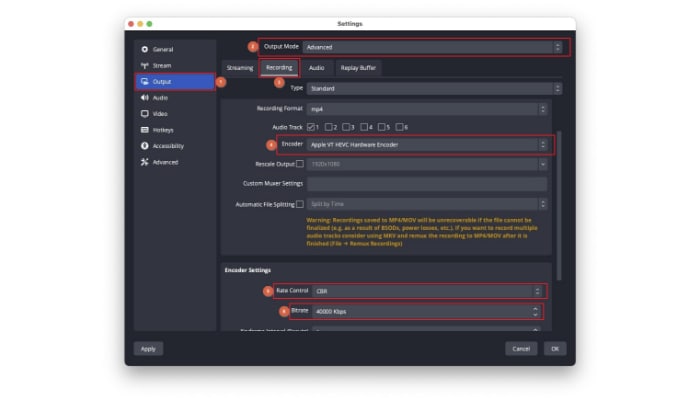
IMDTRRD, YCTAFOSRB:
- AOMRS
GTT'OCOT'SB, C'A'FT'OML, AGTT'R'TS'TO. S'T'RFO'TMP4(OAOF)SIETYETAEFR.
CYPGCIIOTDX24TIS.
AC'CBR'F'TRCLAS'T'BTO40000KPS. IYGCIOS, YMWTS2TW15000KPSAT25000KPS.
- Farbformat
Gehen Sie zur Kategorie "Erweitert" des "Einstellungen" -Feldes. Scrollen Sie im rechten Fenster zum Abschnitt "Video" und wählen Sie NV12 aus der Liste "Farbformat".
Setzen Sie außerdem "Farbraum" ("YUV-Farbraum" unter Windows) auf 709 und "Farbbereich" ("YUV-Farbbereich" unter Windows) auf "Voll"
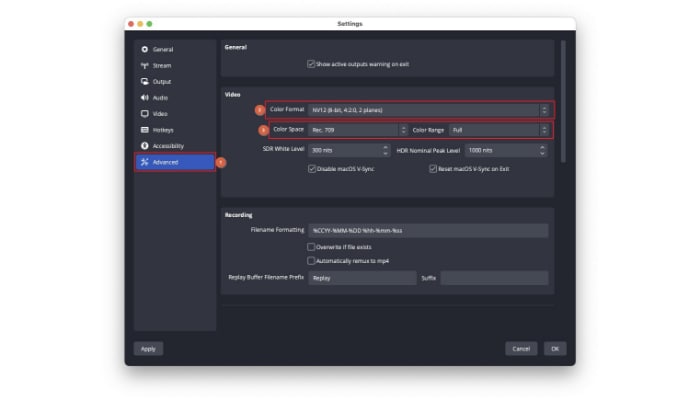
Nachdem Sie Ihre Software konfiguriert haben, nehmen Sie den Bildschirm des Computers erneut auf und prüfen Sie, ob sich die Qualità della registrazione OBSverbessert.
Lösung 2: Einstellungen der OBS-Aufnahme anpassen (nach der Aufnahme)
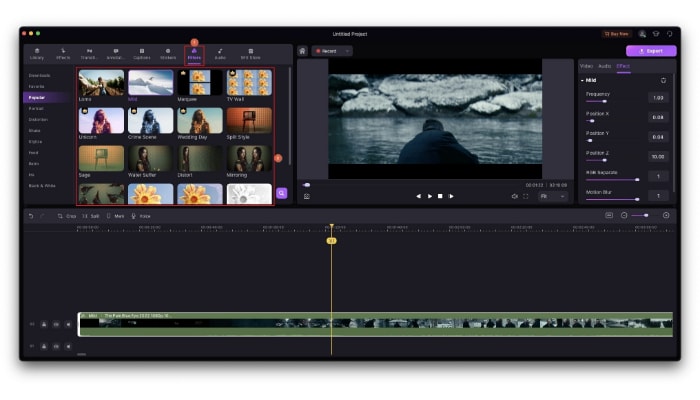
Obwohl es mühsam wäre, Ihren Bildschirm genau so wieder aufzunehmen, wie Sie es das erste Mal getan haben, sollten Sie versuchen, OBS wie in der vorherigen Lösung vorgeschlagen zu konfigurieren und prüfen, ob sich die Leistung verbessert. Wenn nicht, wäre die nächste Option, ein effizientes Videobearbeitungstoolzu verwenden, um einige Filter auf das vorhandene Material anzuwenden, um es besser aussehen zu lassen.
Eine solche Anwendung ist DemoCreator von Wondershare, die Sie von derhttps://democreator.wondershare.com/Collegamento. Dopo l'installazione, è possibile avviare il suo editor video integrato, importare i filmati nel programma, aggiungerlo alla timeline, andare alI filtriSezione dall'alto e utilizzare i filtri disponibili per migliorare la qualità dell'immagine.
Soluzione 3: Scegli la migliore alternativa OBS-Wondershare DemoCreator
Per eliminare in modo permanente tutti i problemi e gli ostacoli sopra discussi, puoi optare per una soluzione alternativa, un programma di registrazione dello schermo efficiente che ti dà il controllo completo sulle preferenze di cattura e le opzioni etichettate in lingua laica in modo che anche i non tecnici possano capirle facilmente.
Wondershare DemoCreator vince la competizione anche in questa arena. Il software è disponibile per le piattaforme Windows e Mac e può registrare lo schermo del computer, la webcam e il microfono simultaneamente o indipendentemente.
Alcune funzionalità chiave che DemoCreator ha includono:
- Registrazione programmata
- Up to 4K export resolution
- Built-in video editor
- Annotation on recorded videos
Although DemoCreator is the first choice of vloggers and game players, you can use it to create interactive tutorials or demonstrate any issue or solution to your colleagues, family, or friends.
You can follow the step-by-step instructions given below to record the computer screen in high quality with DemoCreator, and export the footage in your preferred format:
Step 1: Set Up Recording Preferences.
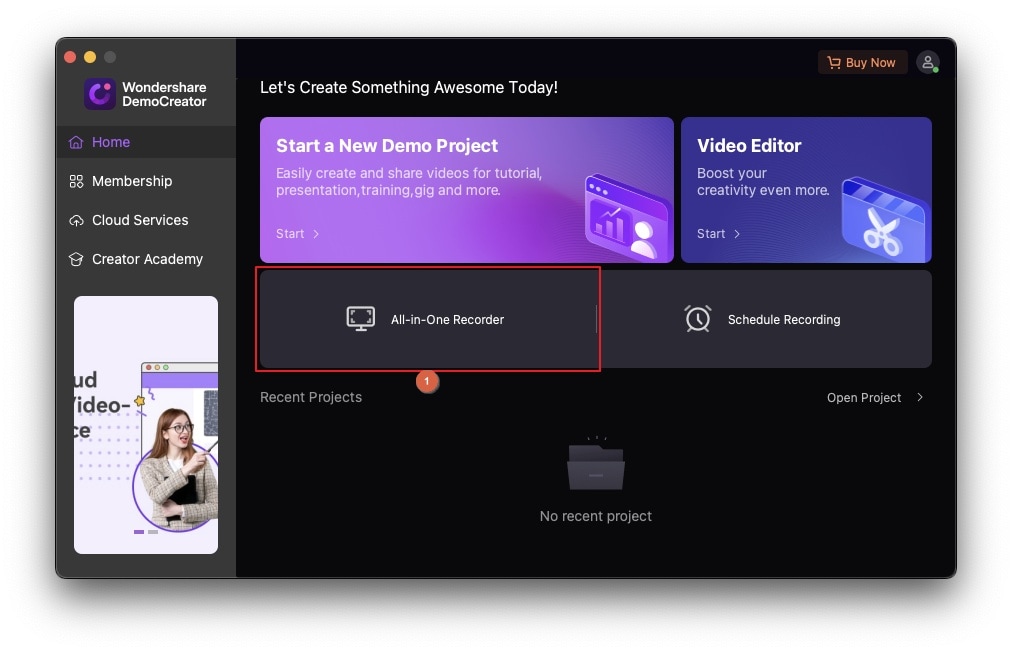
After installing DemoCreator on your PC, launch the program. Click All-in-One Recorder from the first window.
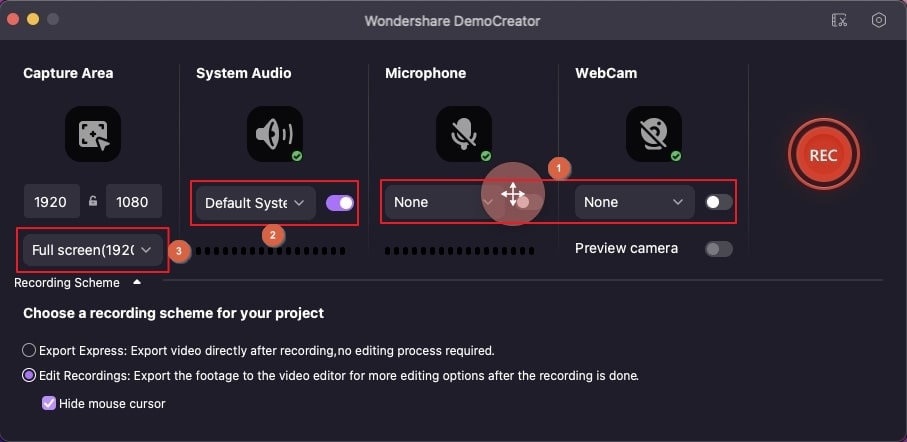
When the recording panel opens, turn on or off the following buttons according to your needs:
- SA - EWIW DemoCreator to record any sound your PC generates. E.g., notification note, error sound, etc.
- Mic - EWIW to record your voice along with the screen capture.
- WC - EWIW when you want to show your face while capturing your PC screen. This makes the videos more engaging and establishes trust between you and the audience.
IA, ensure that the CA is set to FS. Opzionalmente, puoi selezionare o deselezionareNascondi cursore del mouseCasella dalla parte inferiore del pannello per mostrare o nascondere il puntatore del mouse nell'output.
Passo 2: Registrare lo schermo del PC.
Dopo aver impostato le preferenze di registrazione, fare clic suLa RECPulsante sul pannello per iniziare a catturare lo schermo.
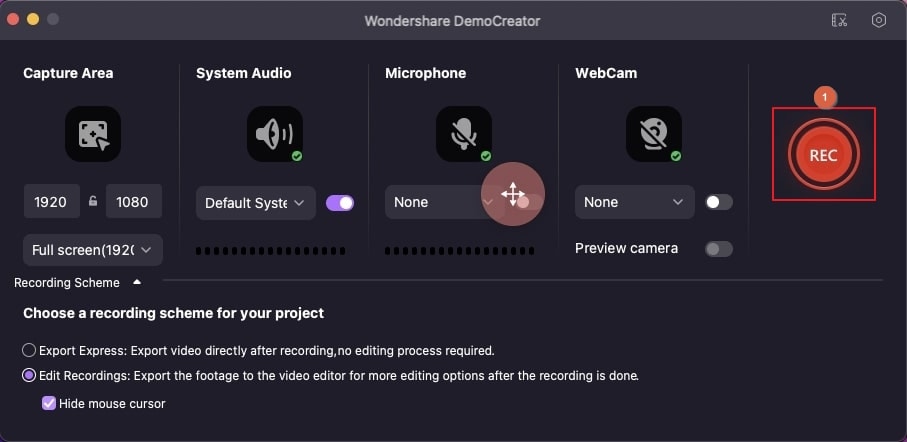
Una volta fatto, fare clic suFerma...Pulsante sulla barra degli strumenti galleggiante o premereF10...(su Windows) ocmd... + Il turno + 2(su macOS) per interrompere la screen catture.

Passo 3: Modifica ed esporta il video in alta qualità.
Aspetta mentre l'editor video integrato si avvia e aggiunge automaticamente la clip registrata alla timeline.
Ora puoi selezionare la traccia video nella timeline e utilizzare gli strumenti disponibili nella mini barra degli strumenti sopra di essa per modificare il filmato per dargli un tocco finale.
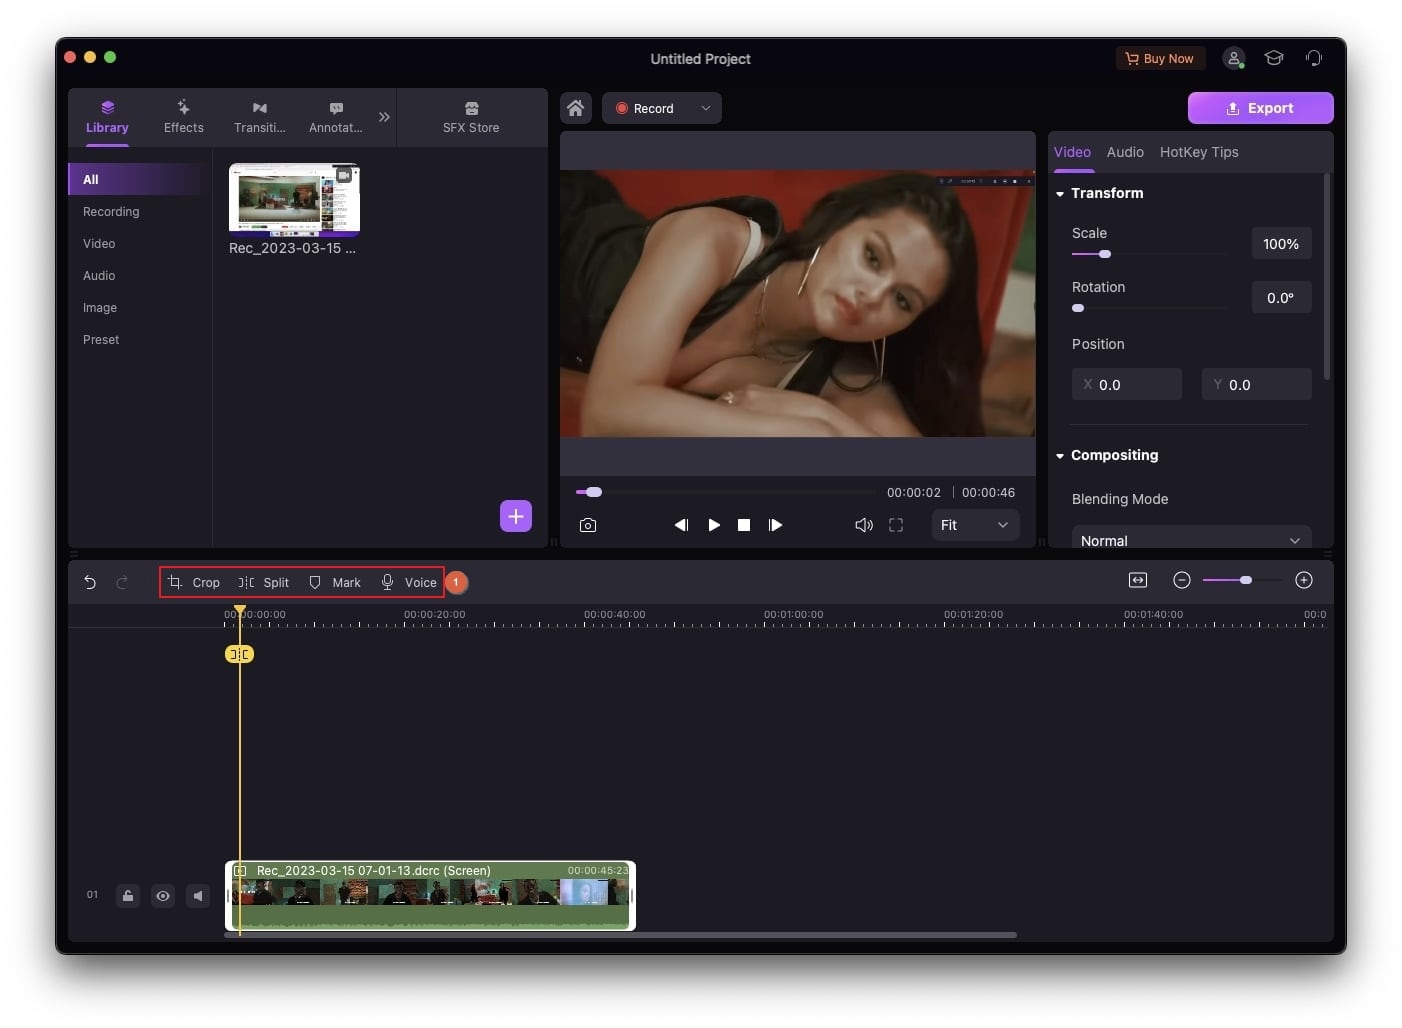
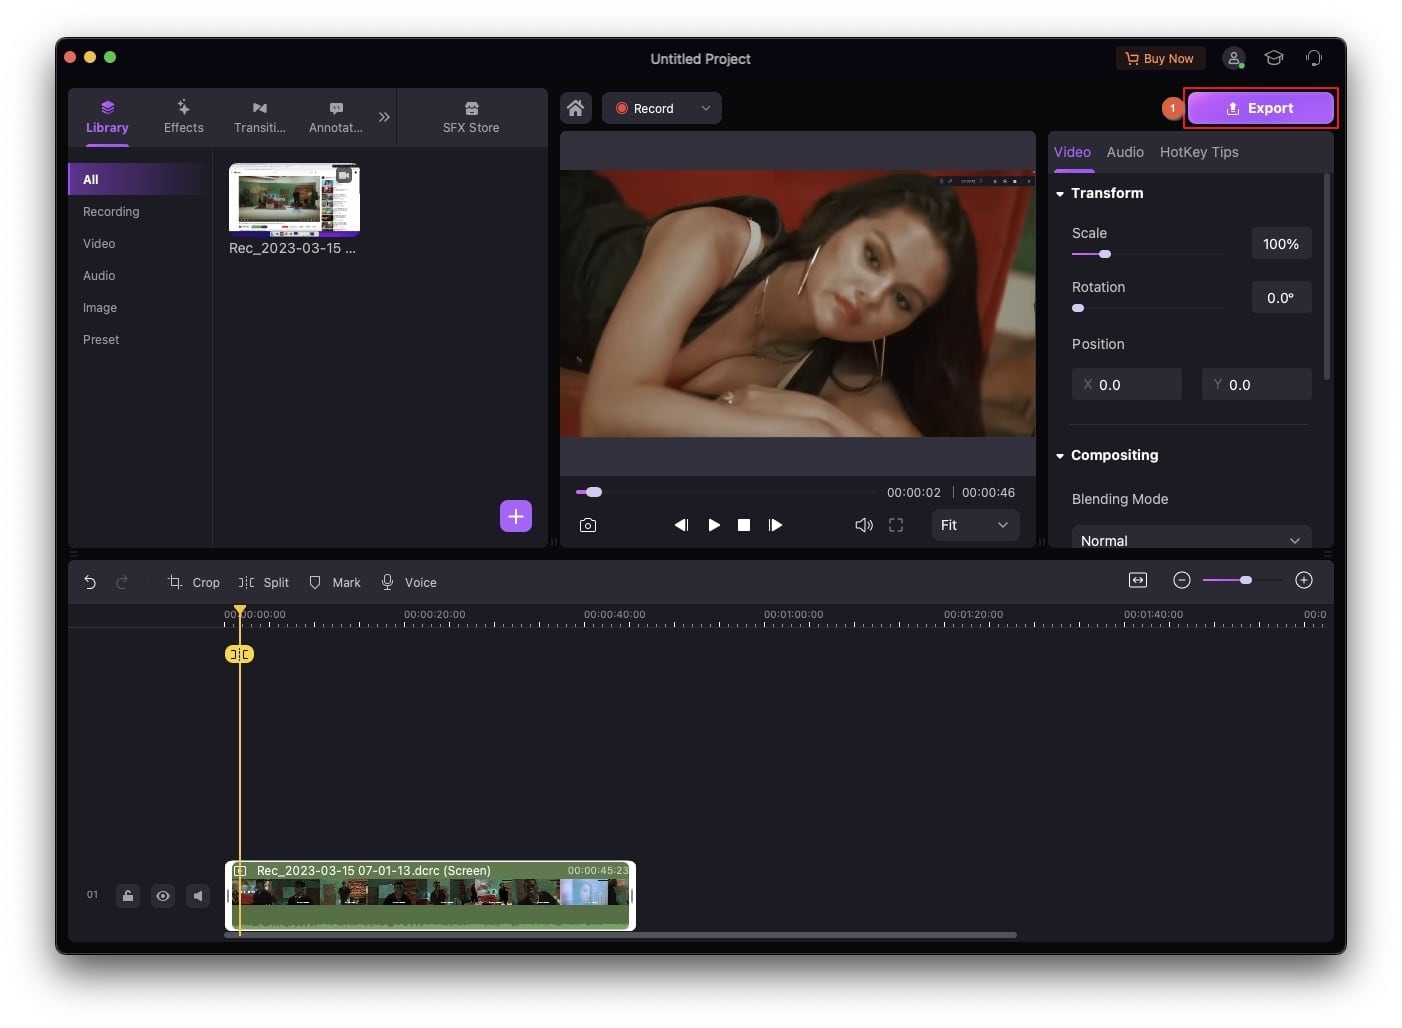
Quando tutto è tutto pronto e sei soddisfatto dei risultati, cliccaEsportareDall'area in alto a destra dell'interfaccia.
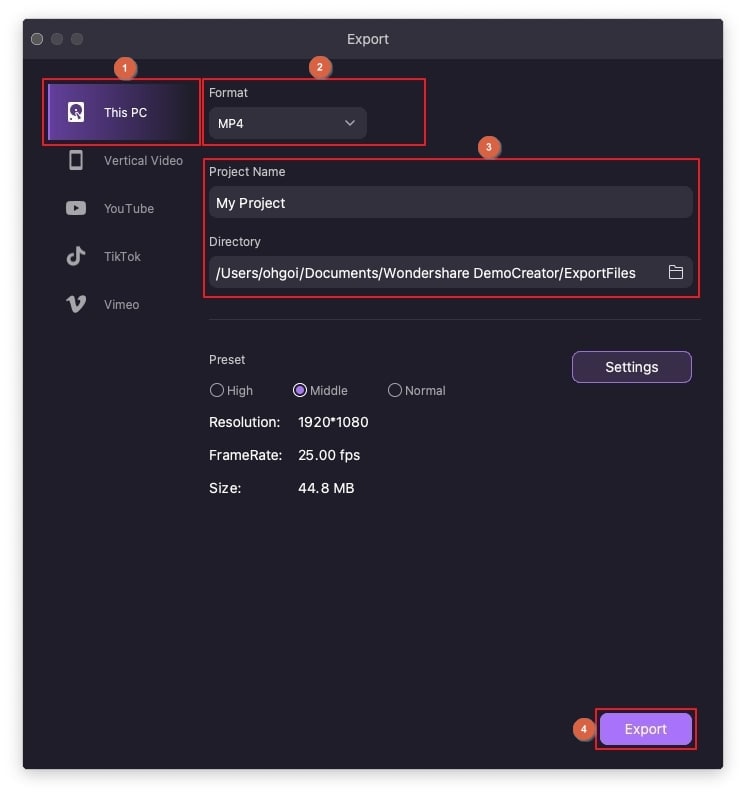
Su...EsportareScatola, assicurati cheQuesto PCè selezionato nella barra di navigazione a sinistra. Dalla finestra destra, scegli il formato di output preferito, dare un nome al file di output e impostare una cartella di output.
Opzionalmente, clicca suLe impostazioniScegli una risoluzione diversa da quellaRisoluzione?Elenco. È possibile anche scegliere il valore più alto disponibile che è 4096p x 2160p per ottenere la migliore qualità video. Clicca suOK untuk menyimpan pengaturan.
Akhirnya, klik Esportaredari area kanan bawah kotak sebelumnya untuk mengekspor rekaman Anda untuk dibagikan, didistribusikan, atau disiarkan.
Kata-kata Terakhir
OBS adalah alat screencasting gratis, sumber terbuka, dan lintas platform yang banyak digunakan oleh para profesional. Namun, kekurangan terbesar dari aplikasi ini adalah bahwa tidak memiliki editor bawaan. Dengan kata lain, apa pun yang Anda rekam adalah final; kecuali Anda menggunakan perangkat lunak yang berbeda, Anda tidak dapat mengedit rekaman tersebut.
Selain itu, program ini memiliki beberapa opsi konfigurasi yang dapat Anda gunakan untuk menyesuaikan resolusi video jika ORQB. Meskipun ini bagus bagi banyak pengguna berpengalaman, orang baru dan pemula mungkin menemukan hal tersebut sangat menakutkan untuk menghadapi teknisitas seperti itu.
Mengingat semua hambatan ini, Anda mungkin membutuhkan alat yang efisien seperti Wondershare DemoCreatoryang melampaui kualitas rekaman OBS, tidak memiliki kurva pembelajaran yang curam, menawarkan antarmuka yang intuitif, dan memberi Anda opsi untuk menyelesaikan penyuntingan rekaman Anda tanpa harus menginstal perangkat lunak pihak ketiga apa pun.

![Non riesci a scaricare video di YouTube? [Perché e come riparare]](https://images.wondershare.com/democreator/thumbnail/cover.png)
David
chief Editor
0 Commento(i)