Come estrarre audio dal video con iMovie?
Do you want to get the separate audio from video? Actually, it's not a hard task, you only need a tool to finish this. If you're a Mac user, the iMovie is a great tool to extract audio from video. In this article, you can get the detailed steps about how to extract audio from video with iMovie.
1. How to Extract Audio from Video with iMovie Mac
iMovie is a video editor that for iOS and macOS users. It owns numerous editing features and can be used on different platforms (Mac, iPhone, iPad). Not only extract audio and audio editing, it also performs marvelously in video editing. The user-friendly interface can empower your video editing ideas. Below are the detailed steps about how to extract audio from video with iMovie.
Step 1. First, launch iMovie. Then click on the “Projects” tab, hit the “Create New” option, and begin the extraction process.
Step 2. Then click on the “Import Media” option and wait for the “Finder Wizard” to pop up. Select the video files you wish to extract audio from.

Step 3. Drag the file to the iMovie timeline. Then go to the top-right corner of the iMovie interface and click on the “Export” option and select the “File”.
Step 4. Change the Format from “Video and Audio” to “Audio Only”. Also, you should select the output format you wish the extracted video to be in from the “File Format” drop-down option then hit the “Next” button. iMovie supports MP3, AIFF, WAV, AAC, among other formats.

Step 5. Your audio just got extracted from the video, then select a destination path to save the audio file. iMovie will automatically convert and download the file and save it to the selected destination path. Finally, extract the audio file from the output folder.
2. Extract Audio from Video with DemoCreator
As we've discussed above, iMovie is a suitable tool to make audio extracted from video on Mac. But we can figure out that the steps seem complicated. If you want to find an easier tool to extract audio, then the DemoCreator will be a better choice.
Different from the iMovie, the DemoCreator suits not only Mac, but also Windows. And if you want to make audio detach from video, the steps will be easier than iMovie. Moreover, it supports you to add multiple sound effects and music resources. It's driven into screen recording and video editing attached numerous video effects, which make you record and edit video/audio in one stop. Below are the detailed steps to separate audio from video with DemoCreator.
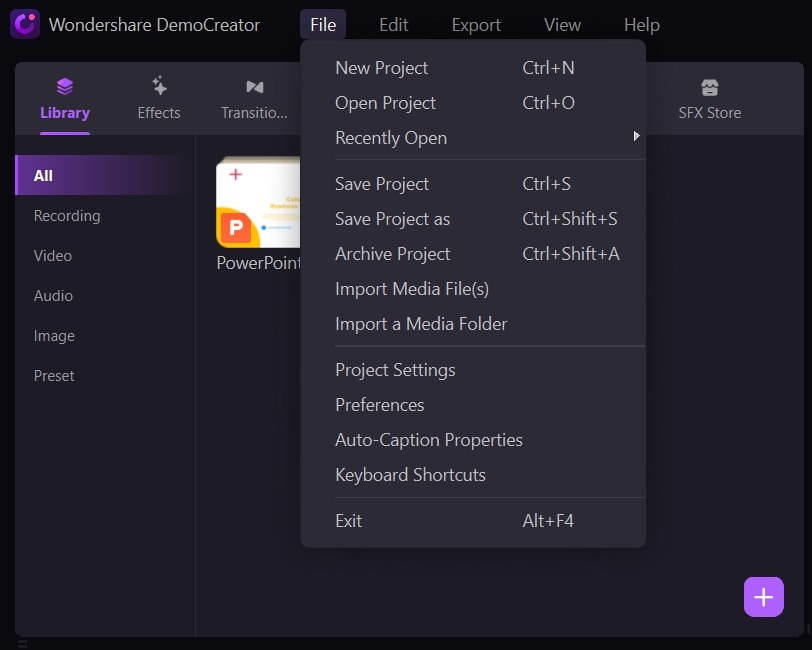
Step1. Launch DemoCreator and select "Video Editor"
First, launch DemoCreator and select the “Video Editor” in the start-up window.

Step2. Import video and drag to timeline
Double-click to import the media file that you want to make audio detach, and add it to the timeline.

Step3. Extract Audio
Select your audio in the timeline and right-click, choose the “Audio Detach” from the sub-menu. Then the audio and video file will show on 2 different tracks.

Step 4. Export audio and video
Your video and audio are now separated and you can save and export them. Just click the “Export” tab at the right corner of the interface to export the audio track.

How to Rich Your Audio?
1. Add sound effects and suitable music to audio
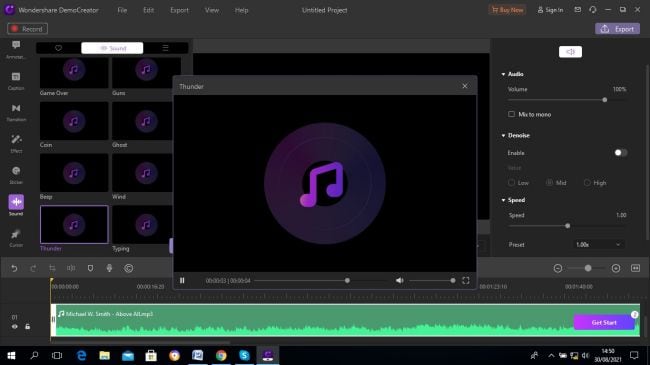
With DemoCreator, you can make advanced edits to your audio by adding sound effects that enhance your video by providing clues about the environment of the subject. Among the sound effects you can add to your audio in DemoCreator include sounds of thunder, wind, coin, ghost, game over, gun sounds, etc.
Steps to add sound effects to your audio:
Step1. Go to the “Menu” bar and click the “Audio” option. Next, choose the “Sound” effect from the left-hand side of the DemoCreator window. A collection of sound effects will be availed for you to choose from.

Step2. You can choose the sound of a beep, typing, coin, thunder, game over, etc. You can as well adjust the audio. Just click on the audio clip and go to the “Audio Settings” window on the right “Properties” pane. Here, you can change your audio’s speed and volume among others Once you have chosen which effect to add to your audio, drag and drop it onto the timeline clip..
Step 3. Infine, salva ed esporta il tuo video in qualsiasi formato.

3. FAQ sulla modifica audio in iMovie
IMovie presenta funzionalità avanzate di modifica audio che puoi applicare al tuo audio.
1) Come dividere una clip audio in iMovie
Per dividere l'audio
- Prima di tutto, aprire un progetto in iMovie.
- Quindi scorrere attraverso la linea temporale verso il posto in cui si desidera dividere la clip.
- Successivamente, tocca la clip audio.
- Vai al menu "Azioni" e tocca sul pulsante"Forbici ".
- Infine, tocca sull'opzione"Split "per dividere il tuo audio.
2) किसी ऑडियो क्लिप की अवधि को कैसे समायोजित करें
अगर आप अपनी ऑडियो क्लिप की अवधि को छोटा या लंबा करना चाहते हैं,
- iMovie पर एक परियोजना लांच करें।
- उस ऑडियो क्लिप पर टैप करें जिसकी आपको छोटी करनी है।
- फिर ट्रिम हैंडल्स का इंतजार करें।
- अगले, हैंडल्स को क्लिप पॉइंट्स पर खींचें।
- अंत में, अपनी ऑडियो को समायोजित करने के लिए ऑडियो क्लिप के बाहर टैप करें।
3) परियोजना से ऑडियो क्लिप को कैसे हटाएं
iMovie संपादक आपको बहुत आसानी से परियोजना से ऑडियो क्लिप को हटाने की सुविधा भी देता है।
- सबसे पहले, iMovie में अपनी परियोजना खोलें।
- Successivamente, tocca e tenere premuto la clip audio.
- Quindi trascinare l'icona della clip audio sopra la linea temporale.
- Una volta che vedi un effetto"Fumo ", rilascia la tua presa e avresti rimosso la clip audio.
Conclusioni:
L'articolo totale ha introdotto 5 passaggi per estrarre audio dal video con iMovie. Se siete un profondo utente Mac, allora iMovie sarà meglio per voi per fare l'editing audio. E la seconda parte è l'altro modo per separare l'audio, Wondershare DemoCreator. Rispetto a iMovie, il DemoCreator sarà più facile e ti supporta per registrare audio. E ha anche la versione Windows.


David
chief Editor
0 Commento(i)